It’s not a ‘one size fits all’ setup, but most obstacles can be overcome with a little creativity
Marine radar was once reserved for the largest and most expensive pleasure boats on the water, but that’s certainly not the case today, and with good reason.

With pricing that’s in the range of many boaters’ budgets — and considering the safety and other benefits it can provide — radar has become a popular option, whether outfitting a new boat or upgrading an older one. And it’s being integrated with plotters and multifunction displays, eliminating the clutter of multiple screens at the helm and making installations practical on boats smaller than 25 feet.
I’m often asked why I installed radar on my 21-foot Boston Whaler center console. I don’t run offshore to fish, and I don’t use it commercially. So I shouldn’t be out in limited visibility, right? If my boat stayed on the trailer every time the weather forecast was anything but ideal I’d probably never go boating. Truth is, I’ve been caught out once or twice too often when the weather turned and fog set in. Or, it has taken me longer to return to port than anticipated, and I must navigate unfamiliar waters at night.
Obviously, I would be less concerned if I were aboard my 36-foot trawler. With the larger boat, I can wait out most scenarios and weather conditions in relative safety and comfort, putting up the radar reflector so I can be seen by other boats equipped with radar. Not so in the smaller boat.
When piloting a small boat — say, 17 to 25 feet or so — there is a greater sense of urgency in maneuvering. You’re not the big guy looking down but the little guy looking up. A larger vessel often cannot see you even with radar, partially because of your size and the fact that the radar may be set on longer ranges for tracking rainstorms or finding that flock of birds circling over fish. Let’s just say I prefer knowing what is around me and taking necessary action, rather than depending on someone else paying attention and — hopefully — reacting.
In a small boat, your eye is closer to the water, making it difficult to see objects (targets) that are also close to the water, such as aids to navigation, lobster pots, mooring buoys and other small craft. With radar, you will be able to see these targets both day and night, in addition to being able to see land masses more clearly.
When heading toward shore at dusk or nighttime, the illuminated navigation aids often are overpowered by lighting ashore. Radar can help you distinguish between these sources of light and whether they are land-based or on the water. A vessel on a mooring, at anchor or under way and without the required illumination are all accidents waiting to happen. Radar allows the skipper to maintain an edge and enhances what the eyes see, and not only in limited or restricted visibility.
What it can do for you
When combined with a chart plotter, radar is an unsurpassed navigational tool. While a plotter indicates what you will encounter on your course, based on the chart you are using, radar shows what is actually out there. Of course, radar works best when the user is familiar with its features and operation. Unlike plotters, which spell out most of what they are showing, radar requires a certain amount of interpretation. It isn’t difficult to understand, but for it to be an effective tool, you must work with radar to become familiar with what it is depicting.
Practice using radar on clear days so you can match what your eye sees with the on-screen image the radar is producing. Being able to overlay a radar image on an electronic chart or use it in split-screen mode with the plotter is a plus. It won’t take long for you to be able to pick out land masses and aids to navigation, and you’ll certainly know when another vessel is within range.
Modern radar provides a range of features to make it easier to use, and most major electronics manufacturers offer systems that are practical for use aboard smaller boats. Technical specifications and features vary between manufacturers, but as a general rule, the antenna of choice for a small boat is a fully enclosed radome. Radomes are relatively compact in size and consume less power than the open array units typically installed on larger vessels. Maximum range is not really a factor in our application, as I’ll explain later, and beam width varies within only a fraction of a degree between manufacturers.
I have found that the smaller the boat, the more difficult it is to view the data on the display while under way, so get the largest unit that will fit in your boat’s mounting footprint. Most manufacturers offer high-resolution LCD screens that provide clear, crisp, detailed images. There are also backlit LCD screens — waterproof and perfect for small boats — that are easy to see in almost any lighting condition.
Some of the features found in today’s radar systems include VRM (variable range markers), EBL (electronic bearing lines), range rings, guard zones, and MARPA (Mini Automatic Radar Plotting Aid). MARPA is used for target tracking and risk analysis. It tracks numerous targets and calculates target bearing, range, true speed and course. It then calculates the target’s CPA (closest point of approach) and TCPA (time to CPA). An alarm sounds if a target becomes a danger to your vessel.
Even with all of the state-of-the-art technology on the market, there is a new game in town. It is known as broadband radar. It’s based on technology from the military and was introduced by Navico through its Simrad, Northstar and Lowrance product lines. The system is solid state, eliminating the magnetron and its microwave pulses from the radome. The radome contains both a solid-state transmitter and receiver, which simplifies installation wiring, since the signal is processed entirely in the radome. The only wiring between the radome and display are the power cable and a network connection cable.
Power consumption is reportedly 1/10 watt, versus conventional radar’s 2 kW. The new broadband system is said to simplify target identification at extremely close ranges — a breakthrough feature — in addition to a host of other features.
Installation considerations
Small-boat radar installations can be a bit more challenging than those on larger boats. Larger vessels typically have several sturdy, rigid mounting platforms for the antenna — flybridge, hardtop, radar arch, fixed mast, tower — with wire chases to the helm area. An enclosed radome for smaller boats typically weighs 20 to 35 pounds, and that’s a lot of weight if it’s improperly secured and the boat is pitching and rolling in a seaway.


There are numerous mounting systems that can be adapted to almost any vessel style, and many can be combined with antenna and light mounts or rocket launchers. Although radome height is a consideration, higher is not always better with smaller boats. There are calculations and tables that provide maximum radar ranges based on radome height above the water, but most of these won’t be useful in our application.
When discussing the radar installation on my 21-foot Whaler with technicians at Raymarine, I was told that at a height of 10 feet above the water, my 2-kW, 18-inch-diameter, enclosed radome would have a range of 3.9 miles to the horizon. Increasing the height to 12 feet would extend the range to 4.2 miles — hardly worth raising the 21-pound unit 2 feet. As I said earlier, I’m much more concerned with my immediate surroundings than what is four miles away.
What is important is that the radome be securely mounted so it has a clear, unobstructed view of the horizon in all directions, and its emitted radar beam is above the normal locations of crew and passengers. The radome also must be installed on the horizontal plane — parallel to the water when the vessel is at the speed/plane angle for which radar performance is optimized. In my installation, that meant raising the rear of the radome 3 or 4 degrees. It actually appears to be “looking” down while the boat is at rest but is horizontal when under way.
Wiring is not complicated — usually plug-and-play with simple connectors throughout. The display should be mounted for best viewing from the helm and should be viewable by a second person without interfering with the operator. It’s great when there is a second person to either run the boat or monitor the electronics when situations warrant. Plan ahead.
As mentioned above, many small boats can easily be fitted with radar by using prefabricated mounts and brackets, mostly without modification to either the boat or the mount. Some installations, however, require a bit of creativity. As with most projects, it’s not always a “one size fits all” world.
1972 Boston Whaler Outrage
When I restored my 21-foot Whaler several years ago, I wanted to retain as much of the boat’s original appearance as possible. When I considered installing radar, I realized that there were a few obstacles to overcome. The boat has a low profile, occasionally wearing a canvas flying Bimini instead of a T-top or arch. I trailer the boat through areas with low tree branches, including those in my own driveway, so I had to keep the trailering profile as low as possible. Also, there are local gunkholes that occasionally require transiting under bridges with very low clearances. These issues meant that my radome assembly had to be easily removable.
As for the helm display, I wanted the largest screen possible to make viewing easier without drilling through or otherwise modifying the teak console. The display needed to be easily viewable from both standing and seated positions. The installation details became as important as the radar itself.
Radar arches and T-tops work well for installing radar on small boats, but they aren’t easily removable and don’t really work aesthetically with my 37-year-old Whaler. I decided to install a single-point mast for the radome. I looked into prefabricated masts, similar to those used on many sailboats, but I couldn’t locate the exact piece I would need, so I was left with fabricating one for my installation.
The construction of this model Whaler complicated the installation. The walkway between the gunwale and center console is very narrow, so I had to mount the mast through the gunwale to preserve what little walkway exists. The hull sides and gunwale on this boat provide very little structural support, so I made several mock-ups using PVC pipe to get a feel for the best mounting location.
The material I used for the mast was 1.5-inch-diameter, 1/16-inch-wall 316L stainless tube, with a 3/16-inch-thick stainless plate cut to fit the radome — an acceptable compromise between rigidity and light weight. Height from the deck to the bottom of the radome is 7 feet, giving me ample room to walk below the antenna and clear the canvas Bimini top, while keeping the radome as low as practical. The height of the radome also prevents anyone on board from being bombarded with waves from the magnetron.
Fitting the mast so it would be easily removable required a bit of thought. The mast assembly would have to slide through the gunwale to the deck and be directionally retained.

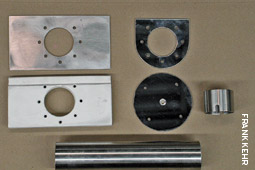
The base for the mast comprises a 2-inch-diameter stainless tube and a 4-inch-diameter stainless plate welded together to form a socket for the mast to sit in. I machined a piece of Delrin (thermoplastic polymer) to fit inside the socket, bringing the internal diameter of the socket down to 1.5 inches so the mast fits snugly into the socket without metal-to-metal contact.
Since Boston Whalers are built with a foam core for buoyancy, the socket required support beneath the fiberglass deck and waterproofing where the fasteners would penetrate. I cut a 2-inch-diameter access hole into the deck and removed the foam out to approximately 6 inches in diameter. I filled the void with West System epoxy blended with several different fillers, adding strength to the area and assuring that there would be no water penetration into the foam.
While the epoxy was in its green stage (firm but not fully cured), I drilled through the deck and into the epoxy blend to install threaded stainless inserts for the deck socket’s four mounting bolts. Since the load on the fasteners would be mostly in shear, I wasn’t concerned about pulling the threads or inserts out. The fasteners were then installed using BoatLife sealant.

I had to cut a 2-inch hole in the gunwale with a hole saw for the mast assembly. The mast sleeve that passes through the gunwale is also fabricated from 2-inch-diameter stainless tube with a Delrin insert for a snug fit. The sleeve is welded to a 4-by-6-by-3/16-inch stainless plate, and the assembly is bolted beneath the gunwale for support. In keeping with the “original appearance” consideration, the stainless “finish” bezel I made for the gunwale is patterned after those used by Whaler for the four fuel fills.
Having gone this far by myself, I realized that the upper portion of the mast would need additional support to prevent it from flexing and swaying while under way. I contacted Jeff Botelho at J&J Marine Fabrication, which specializes in custom fabrications. I took a trip to J&J’s Somerset, Mass., facility, and they made quick work of bending stainless tubing to add a rear leg truss to the mast with a quick-
disconnect fitting for securing the leg to the gunwale.
Wiring for the Raymarine radome passes through the mast and exits through a slot at the bottom. The wire plugs into a permanent extension cable, allowing the entire assembly to be installed or removed by one person.

I mounted the Raymarine C120 multifunction display to the console’s stainless windshield support by combining two stainless Bimini fittings, the Raymarine factory mount and a few sections of flat stainless stock welded together. The wiring was routed through the console by making a riser for the electronic compass and using the existing opening from the original flush-mount compass.
Whaler redux
Paul Jutras, a fellow Whaler fan from Jamestown, R.I., wanted to install radar on his 22-foot 1980 Outrage. Our desires were similar, but we have different skill sets. Paul is a professional cabinetmaker and saw an opportunity to put his skills to work on his boat. He made his radar mount from mahogany.
Paul is an avid fisherman, and he didn’t want a

T-top because of the overhead clearance issues. “I fish reefs and boulders in breaking white water,” he says. “I need to be at the helm driving and casting at the same time. A T-top would get in the way of casting.”
He also wanted unobstructed access to the center console. The radar arch he made is only as wide as the console, providing overhead clearance for both walkways.
Paul decided on the shape and dimensions and then created a mold for the arch from two layers of 3/4-inch particle board. He then used mahogany boards cut into 1/8-inch strips and laminated them inside the mold using West System epoxy. The completed radar arch, with uprights measuring 1-3/4 by 1-3/4 inches, was then painted to match the boat. It is easily removable, allowing the boat to be stored in the garage.
The arch has the appearance of square tubing, with beautiful radiuses on the upper corners, but it’s all laminated mahogany. The arch, which holds radar, GPS and VHF antennas, is bolted directly to the console using 5/8-inch-diameter stainless bolts. Wiring is run within a channel down one leg.
After running the boat, Paul needed to lower the height of the arch to eliminate flexing, so he cut
6 inches off each leg and reinstalled it. He also modified the center console to accommodate the installation of various electronics. Most of the modifications were done using mahogany covered with white laminate for weather protection.
These two projects show how a bit of creativity can help create unique installations. If you have an idea or can visualize the finished project, there are people who can help you execute. Radar is an extremely valuable navigational tool. Take the time to do a good installation, then take the time to work with the system and learn its features — before you need to use them.
Frank Kehr is a technical writer for Soundings.
This article originally appeared in the July 2009 issue.