

When I bought my O’Day 31 back in 1985, I knew it was important to cover my sloop over the winter to prevent routine wear and tear, and the possibility of more serious problems.
Owners who never covered their boats, or whose covers failed, accumulated snow and ice in the cockpit. It could melt and flow into the transom drains and then refreeze, splitting the hoses and sending the water into the bilge, where it could cause more damage and encourage the growth of mold and mildew. So, I needed to protect the Adele B. There were multiple options. And even after I decided what to do, I ended up changing my system several times until I perfected it.
The Cover Type
The first choice was the kind of cover: custom-fit canvas, tarp or shrink-wrap.
When I’m in the boatyard, I always admire the custom-fitted canvas covers, with their slim profiles and their zippers and snaps for easy installation. They do seem to last indefinitely, but I passed on that route because of the expense.
I’ve never been a fan of shrink-wrap, for several reasons. It’s more expensive than using a tarp, and it can’t be reused like a tarp or a custom canvas cover. From what I’ve read and heard from owners, the tight-fitting shrink-wrap allows for no ventilation. It can cause heat and humidity to build up inside the boat, and promote the growth of mildew and mold.
Smart owners mitigate that issue by installing vents, but that contributes to an environmental problem: Very little shrink-wrap is recycled, even at environmentally conscious marinas. Research by the staff of Friends of the Bay—the Oyster Bay, New York, environmental group of which I am president and which is dedicated to promoting recycling of shrink-wrap—revealed that little of the plastic sheeting is collected for recycling. And even some of that ends up in landfills or being burned in incinerators because few companies actually recycle the material. Recycling shrink-wrap is also complicated by the necessity of keeping it separate and clean, and it can’t have zippers or vents, which means busy marina staff would have to remove them.
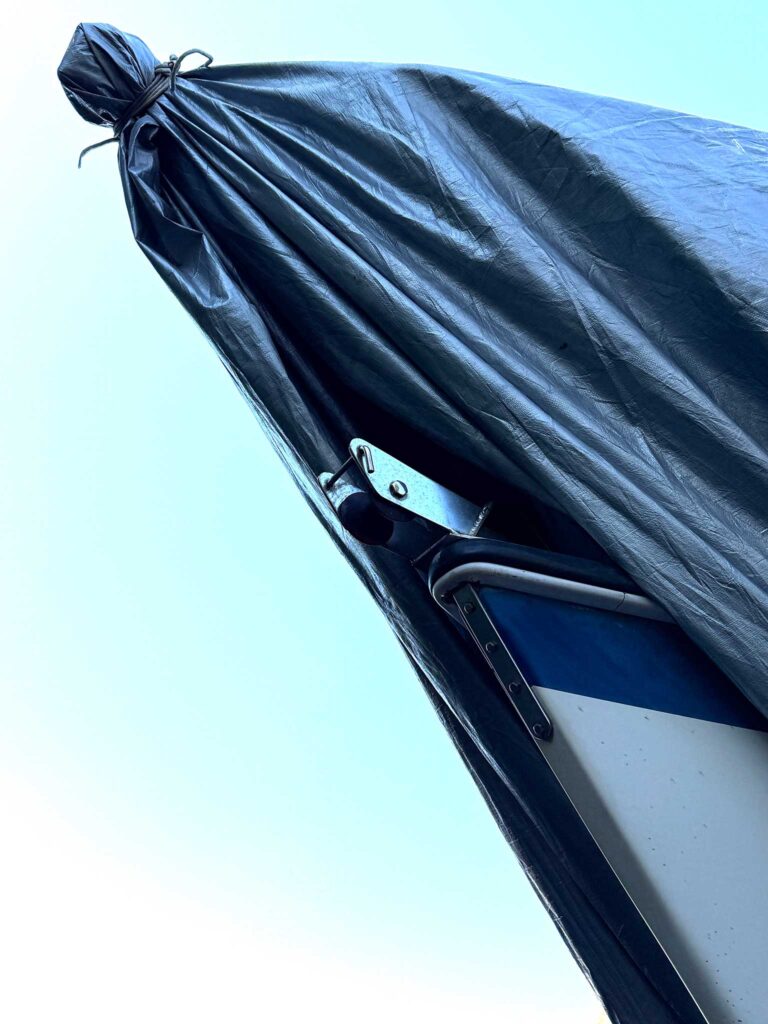
So for me, the only cover option is using a tarp. I’ve seen people trying to do this on the cheap by using thin blue plastic covers. Bad idea: They often fail after just one season of flapping and abrading.
I’ve always gone with the heaviest tarps I could find. But because the tarps, like shrink-wrap, don’t allow air to circulate, I always leave an opening at the bow under the ridgeline PVC pipe so air can reach the cabin-top cowl vent. That helps my DampRid canisters prevent mold and mildew.
The Tie-Down
The next question is how to keep the tarp in place. I learned quickly that just tying the cover to the cradle is not a successful technique. As the wind gets under the boat and flexes the cover, the ropes will stretch, and shift or snap. That movement also degrades the cover and leads to holes where the tarp touches the boat.
You also have to be careful where you tie the ropes. I’ve seen some people tie the cover to the jackstands that hold up the boat, despite reports of insurance claims where the cover turns into a sail and pulls the jackstands out from under the boat.
Another lesson I learned quickly is that you can’t rely on the grommets around the edges of the tarp to keep it on your boat. Under strain, the grommets rarely last more than a winter or two without ripping out. I’ve used duct tape to reinforce the grommets, and I tried plastic clips that were supposed to spread the load along the edge of the tarp, but they didn’t work for me. They either fell off or ripped the tarp.
My ultimate solution, used for decades now, was suggested by the staff at the boatyard. I tie rubber balls into the edges of the cover. You can use those balls to tie down the cover and to hang gallon jugs of water around the edge of the cover. The weighted jugs help prevent the cover from lifting during wind gusts, and if it does lift, they pull it back into place. With this system, my tarps last many years longer and abrade far less.
The weak link in the system is the plastic gallon jugs. I use more robust ones that originally were filled with antifreeze, and I leave room for the water to expand when it freezes, but the jugs still can crack and allow the water to escape. In addition, some of the caps let water evaporate.
Some people fill the jugs with sand or gravel, but I think it’s a lot easier to use water. I leave extra jugs filled with water under the boat for refills as needed.
The Frame
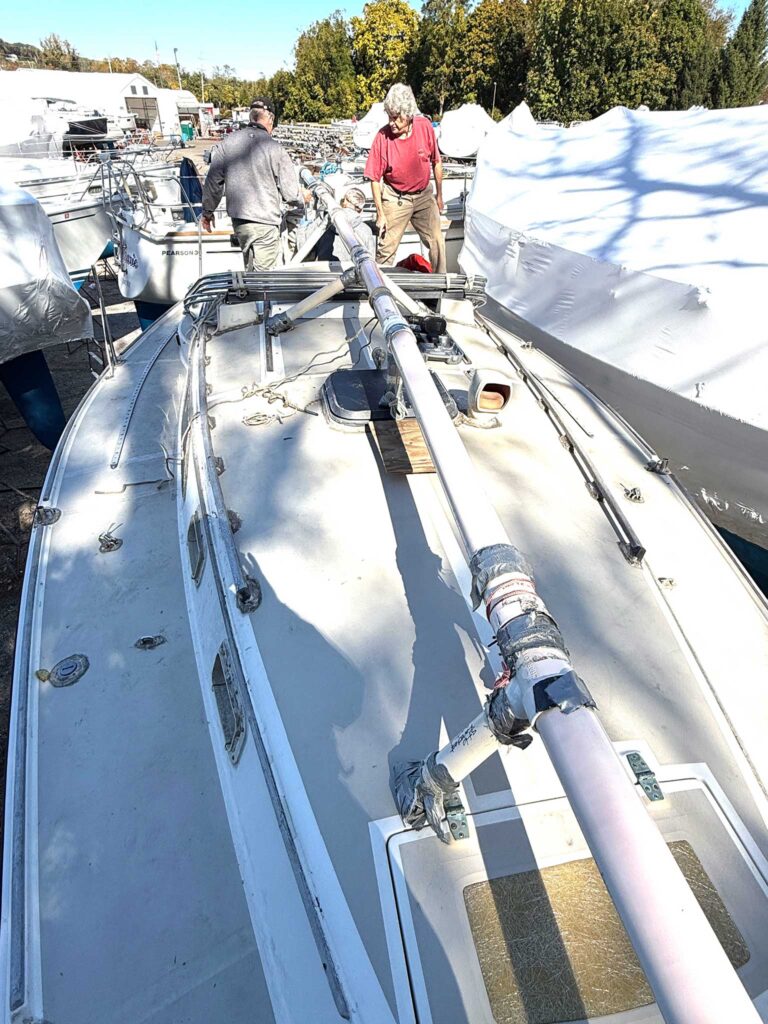
The final question is what kind of frame will best support the cover: metal tubing and clamps, wood slats or PVC pipe.
I had read about using 1-inch metal pipes and clamps. That method sounded simple, but bending the pipe into the proper shapes wasn’t easy. And clamping was a pain. After a couple of seasons, I needed to try something different.
My boatyard uses thin wooden battens to create a frame from scratch every year, but that seemed like too much work. I settled on PVC pipe. It’s easy to position and cut on the boat.
Most people who were using PVC used 2-inch pipe. Being a cautious belt-and-suspenders person, I decided to make the main ridgeline with 3-inch pipe and then use the 2-inch pipe for the supports running down to the deck. Not a smart idea. The 2-inch is strong enough and gives you more flexibility in positioning. But the 3-inch pipe still works, so I haven’t replaced it.
Initially, I used duct tape to hold the sections together, but it didn’t hold in heavy wind, so I now drill holes through each connection and run a long bolt through the pipe.
You want a frame that keeps the cover at a steep enough pitch to shed rain and snow, but that still allows you to get down the deck with the cover on if you need to do off-season repairs. But don’t make it too steep. I did that initially, and when I visited my boat after a storm, there had been so much windage that the entire frame had rotated. This resulted in the ends coming off the deck and hanging in the air.
There were two lessons from that episode. I cut the frame down to reduce the height and windage, and I doubled the amount of rope holding the frame to the boat.
Make sure you tie the frame securely to the boat using winches, cleats and rails that won’t pull out in a heavy wind. Also put duct tape or carpet scraps over protruding bolts, winches or anything else on which the cover will sit, to avoid the abrasion creating a hole.
One Last Bit of Advice
Whatever cover and frame system you choose, you need to check it regularly, particularly after heavy rain or snow.
Many years ago, a lot of snow accumulated on a depressed area of the cover over the cockpit. It split the tarp before I could get to the boatyard. When the snow melted, the water ran down to the drains and the transom, and then froze in them overnight, splitting the hoses.
Because I couldn’t see that part of the cover from the ground, I didn’t discover the problem until I opened up the boat in the spring. I was horrified to see water standing 6 inches above the floorboards, and mold and mildew everywhere.
Trying to drain the water using a hand bilge pump and buckets was getting me nowhere. I had to pull out the sending unit for my knotmeter so the water would drain from the bilge. Reaching down into the freezing-cold water was not fun.
When I told the folks at the boatyard, they asked why I hadn’t taken out the sending unit in the fall, in case of a problem like this one. I do that now, and I put a little plastic scrunchie in the opening to keep out critters.
Each time I visit the boat over the winter, I make sure I can see every part of the cover. And then I go back home to wait for the upcoming sailing season.
September 2025


")


